
Windows built-in tools are the first place to start when you ask, “how do i run a hardware diagnostic on my computer?” They can check system health, memory, storage, logs, and performance without special equipment. A clean test does not rule out every intermittent fault, so match the check to the symptom.
Start by noting what happens, when it began, and any error messages on screen. That record can help you compare later test results and spot changes. Begin with the symptom, not a random scan. A slow computer, a sudden crash, and a PC that will not start need different troubleshooting steps.
This practical workflow helps you choose a first check, use Windows diagnostics, and decide what to do with the results. It also sets clear limits: software checks can point to issues, but some faults need a manufacturer test or repair help.
Key Takeaways
- Choose a first check based on the symptom.
- Save your work before tests that need a restart.
- Use Windows tools for reports, logs, memory, and storage checks.
- Record warning messages, codes, and when problems occur.
- A clean scan is useful evidence, not proof that every part works.
Before running tests, match the symptom to a first check. That keeps troubleshooting focused and helps you avoid tests that cannot answer your question.
Choose the Right Diagnostic for the Symptom
A slow computer that still starts calls for resource checks; one that shuts off unexpectedly needs a different investigation. Choose the first test by what you can observe, then use its findings to guide the appropriate action.
No single scan checks every part or explains every issue. These diagnostics can reveal useful clues, but a tool’s result has limits. A repeated failed start, a blank display, or a full shutdown under load calls for separate checks, not one generic scan.
Start with the symptom, and treat each diagnostic as evidence rather than a final verdict.
Match the symptom to a first check
Use this comparison to pick a sensible starting point. It links common issues with tools, what they can show, and what they cannot prove.
| Symptom | First check | What it can reveal | Limitation |
|---|---|---|---|
| Slow performance | Task Manager and Performance Monitor | Resource pressure | Not a component failure verdict |
| Blue screens or application crashes | Reliability Monitor and Event Viewer | Timing and logged errors | Logs may not identify a cause |
| Boot failure or no display | Manufacturer preboot test and connection check | Detected component or connection issue | A failed check needs model-specific interpretation |
| Shutdown under load | Temperature monitoring and power-related investigation | A possible heat or power pattern | One observation cannot confirm a failing part |
Know what a quick check cannot prove
Task Manager may show a busy processor or a full disk during a slowdown. That points to resource pressure, not necessarily a damaged component. A log can record a crash near an update, but timing alone does not prove the update caused it.
If a symptom repeats, write down what the computer was doing and whether it started again normally. A step-by-step guide to hardware troubleshooting can help you check connections and prepare for further tests.
Next, prepare the computer so an interruption does not cost you work and the chosen checks can finish.
How Do I Run a Hardware Diagnostic on My Computer?
On Windows 11, open a built-in tool, run the check that fits the symptom, save its result, and investigate warnings. That four-step route is a practical way to begin system diagnostics without adding software.
Built-in diagnostic tools report different kinds of information; not all test physical hardware. Performance Monitor tracks system performance, Task Manager shows current activity, Settings offers troubleshooters, and Device Manager lists installed devices and their status.
Open built-in tools in Windows 11
Search for the tool by name from the taskbar. You can also press Win + R to open Run, then enter a command when you know one, such as perfmon /report.
For a slow system, check Task Manager’s Performance tab or generate a Performance Monitor report. For a setting or device issue, use the matching Settings troubleshooter or inspect Device Manager for a warning icon.
When you run diagnostics, save the report or note the exact message. A warning gives you a lead to investigate; it does not automatically confirm a failed part.
Use the same checks on Windows 10
Windows 10 includes many of the same utilities, though menu locations can differ. Search for Performance Monitor, Task Manager, Device Manager, or the relevant troubleshooter instead of relying on a Windows 11 menu path.
If a Settings path does not match your screen, use Windows Search or Run to open the tool. This is often faster than looking through changing menu names.
Keep the sequence simple: open an appropriate built-in tool, run the check for your symptom, save the result, and investigate any warning. Next, take precautions that make longer tests more reliable.
Prepare Windows Before Running Tests
Save open work before starting checks that may require a restart. A few minutes of preparation can protect files and prevent interruptions from spoiling a test.
Back up important files before checks that can repair or change data. Some commands need administrator rights to access protected system information or make repairs. Monitoring tools usually observe activity, while repair checks can change files.
Use this short checklist before running tests:
- Save open work and back up important files.
- Connect a laptop to its power adapter.
- Close applications you do not need for the check.
- Keep the computer awake during longer tests.
- Note recent changes and when symptoms occur.
Record changes such as a new driver, update, app, or memory setting. This configuration information can help explain why stability changed after a specific event.
Do not open a laptop or touch internal components unless you are comfortable with the work and follow the manufacturer’s safety instructions. The next step is a broad Windows report that gives you a baseline.
Generate a Windows System Diagnostics Report
Press Win + R, enter perfmon /report, and press Enter to start a Windows System Diagnostics report. Windows collects information about performance and configuration for about 60 seconds.
Find the finished report in Performance Monitor under Reports > System > System Diagnostics. It can surface warnings, resource use, drivers, services, and configuration details, giving you a broad view before component-specific tests.
Run the report from the Run box
Open the Run box with Win + R, type perfmon /report, then select OK or press Enter. Keep the computer available while the collection runs.
If Windows asks for permission or cannot start the report, check that your account has the access needed to view system information. The report is a diagnostic tool, not a repair program.
Find and review the report
Open Performance Monitor, then expand Reports, System, and System Diagnostics. Select the new report to review its sections and any items marked as warnings.
Note a warning and its timing rather than treating every entry as a failure. A service or driver warning may be routine, and the report does not certify every component as healthy.
Look for a finding that matches the symptom, such as a resource shortage during a slowdown. If unexplained crashes or instability suggest memory trouble, use the dedicated memory test next.
Test RAM With Windows Memory Diagnostic
Windows Memory Diagnostic must restart the computer to test RAM. Save your work first, because the scan runs during startup rather than inside your open Windows session.
A detected error is a reason to investigate the memory or its configuration. A clean result is useful, but it cannot rule out every intermittent fault. Note any recent changes to memory settings or modules.
Follow these steps to run the memory diagnostic:
- Save open work and close apps.
- Search Windows for Memory Diagnostic, or open Run.
- Enter mdsched.exe and press Enter.
- Choose the option to restart and check for problems.
- Let the scan finish, then review its result after Windows loads.
The computer restarts and performs the scan before returning to Windows. Allow the test to complete; interrupting it can leave you without a usable result.
If the result reports errors, record the message and any recent memory changes. A clean scan does not rule out faults that appear only under certain conditions.
After checking memory, turn to drive health checks that Windows can run without a separate boot scan.
Check SSD and Hard Drive Health
A drive’s reported health and the files stored on it are related but different questions. SMART status is drive firmware information that can flag storage health risks before a drive stops working.
A drive warning or worsening symptoms means you should preserve important data promptly. In Windows 11, open Settings > System > Storage > Advanced storage settings > Disks & volumes to view available drive health information.
What Windows displays depends on the drive and system. Use the table to choose a relevant storage check and understand its limit.
| Check | Where to find it | What it can show | Important limit |
|---|---|---|---|
| Windows drive health | Settings, Disks & volumes | Available health information | Not available for every configuration |
| SMART status | Drive health utility | Reported drive indicators | Warning-free status is not a guarantee |
| File-system scan | CHKDSK | File-system or disk errors | Repair options can take time or need restart |
SMART status can identify potential risks, but it is not a promise that the drive will keep working. A drive health utility may show indicators that Windows does not display for your setup.
Back up important files before repair attempts, especially when using options that change the file system. For more on drive and other hardware checks, see this guide to troubleshooting computer hardware issues.
If the drive appears sound but performance drops or the PC gets hot, monitor temperature and load next.
Monitor CPU, GPU, and Temperature
If a game slows down, check resource use while the slowdown happens instead of relying on an idle reading. The workload matters, because a CPU or GPU can appear quiet when no demanding task is running.
Task Manager’s Performance tab shows basic CPU, memory, disk, and network activity. Sensor visibility varies by PC, and temperature readings may require a compatible monitoring utility.
Watch readings while you reproduce the usual workload, then compare them with idle behavior. Note whether high use, heat, or a drop in performance appears at the same time as the symptom.
Temperature limits vary by component and manufacturer, so avoid applying one universal cutoff. A reading makes sense only when compared with the limits for that specific part and system.
Stop a load test if the PC crashes, shows visual artifacts, becomes unusually hot, or behaves abnormally. Do not keep pushing the system just to collect more performance metrics.
Task Manager can show a pattern, but it does not by itself name a failed component. If the problem needs a timestamp or event record, check Windows logs next.
Review Reliability Monitor and Event Viewer
After a crash or failed update, check Reliability Monitor for events around that time. Its date-based timeline can show application crashes, update failures, driver issues, hardware errors, and other critical events.
A log entry records an event, but it does not prove hardware failure. Open Run with Win + R, enter perfmon /rel, and press Enter to view the Windows reliability timeline.
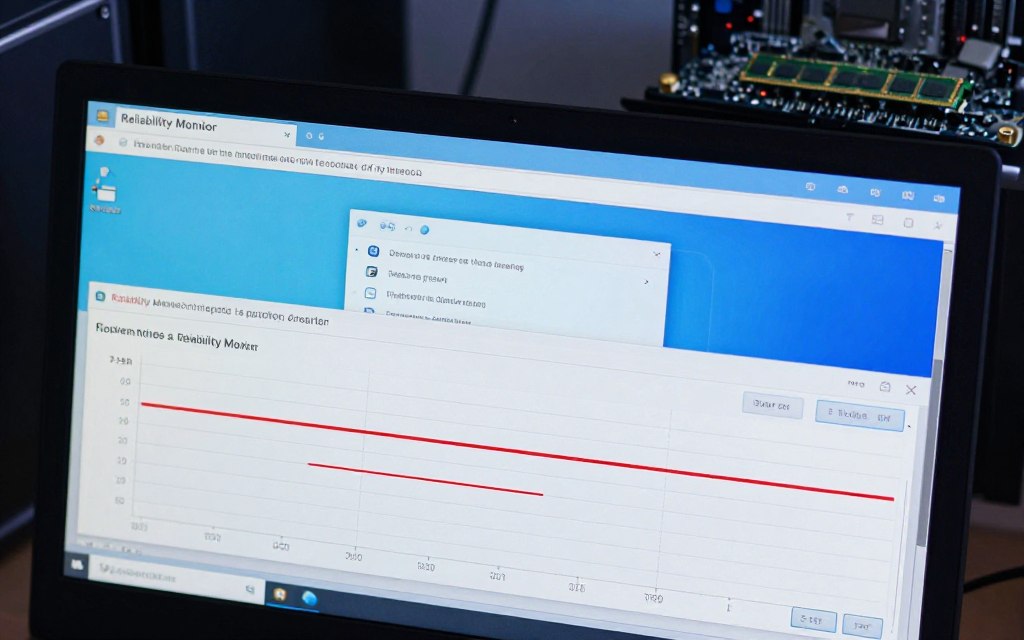
Select a date or event to see its summary. If you need more detail, use the related event information in Event Viewer, which records Windows events and error details.
Compare the time of an error with a restart, update, driver change, or application crash. A close match may help identify what changed, but it does not prove that event caused the problem.
Windows Security scans can help investigate malware symptoms, while network diagnostics can help with connection problems. Neither replaces hardware checks, and a log entry alone cannot identify the root cause.
Once you have checked the timeline, Windows commands can verify protected files, disk errors, and power efficiency.
Run Windows File, Disk, and Power Checks
Windows commands check different system layers, so they are not interchangeable. Choose by symptom: file repair, disk checks, and power reporting answer different questions.
Back up important files before using CHKDSK repair options. The /f and /r options can change file-system data, may schedule a scan for restart, and can take time.
Run these commands from an Administrator Command Prompt where noted. Review the result before deciding whether another check fits.
| Command | Run it from | What it checks | Practical note |
|---|---|---|---|
| sfc /scannow | Administrator Command Prompt | Protected system files | Review the completion message |
| DISM /Online /Cleanup-Image /RestoreHealth | Administrator Command Prompt | Windows image health | Use when file corruption persists |
| chkdsk /f /r | Administrator Command Prompt | File-system and disk errors | May schedule at restart and take time |
| powercfg /energy | Elevated Command Prompt | Power efficiency | Creates a report, not a PSU test |
Run sfc /scannow to check and repair protected system files. If corruption persists, run DISM /Online /Cleanup-Image /RestoreHealth to check and repair the Windows image.
CHKDSK checks file-system and disk errors, but its repair options are not a quick observation. The powercfg /energy command creates a power efficiency report; it does not directly test a physical power supply.
If Windows cannot start or a model-specific test is needed, use the computer maker’s diagnostics.
Run Dell Diagnostics From Windows or F12
A Windows-based Dell test runs inside the operating system, while a preboot test runs before Windows loads. The preboot route helps when Windows cannot be reached or a model-specific check is needed.
Dell SupportAssist can automate hardware diagnostics on supported Dell systems. Dell menu names and available tests vary by model, so use the exact model name when choosing a test.
Start Dell checks from Windows
Use these steps to start with a Dell system:
- Identify the exact Dell model.
- Open the available Dell SupportAssist or diagnostic option in Windows.
- Run the relevant check and save any error code.
- If Windows cannot start, restart and open the F12 one-time boot menu.
- Select Diagnostics if the model’s menu offers that option.
Run Dell diagnostics before Windows starts
Use F12 to open the one-time boot menu, then choose Diagnostics if it appears. The test can check hardware before Windows loads and may offer quick or more specific tests.
Dell’s preboot diagnostics instructions explain how to use the F12 menu and review test results or error codes.
F12 opens the one-time boot menu; F2 commonly opens BIOS or UEFI setup, and F8 may access Windows startup options on some systems. These keys do different jobs.
For a Dell hardware diagnostics tool download, use Dell’s official support channel rather than an unverified installer. Save any error code exactly as shown, then compare it with guidance for your model.
If your PC has no usable manufacturer utility, a reputable specialist tool may cover the component you need to test.
Choose a Third-Party Hardware Diagnostic Tool
A Windows summary may show a performance issue without giving component-level detail. A specialist utility can show more about one part, such as supported processor checks or available sensor readings.
Choose a tool that matches the suspected component and your system. No single diagnostic tool tests every part, and a utility’s result has limits.
| Tool type | Example | Best fit | Limit |
|---|---|---|---|
| Processor test | Intel Processor Diagnostic Tool | Supported Intel CPU checks | Not a whole-PC test |
| Bootable memory test | MemTest86 | Deeper RAM testing outside Windows | Requires preparing boot media |
| Drive health monitor | CrystalDiskInfo | Supported drive status indicators | Not a repair guarantee |
| Sensor monitor | HWiNFO | Compatible temperature and sensor readings | Readings depend on available sensors |
Manufacturer options include HP PC Hardware Diagnostics and Lenovo Diagnostics Solutions. These may offer checks designed for their own systems and parts.
Download utilities only from the official publisher or device maker, and check compatibility before use. A bootable test also needs the correct boot media and startup method for your PC.
If the relevant test reports no errors but the symptom continues, investigate when and how it occurs instead of adding random tools.
Troubleshoot No-Boot and Sudden-Shutdown Symptoms
Fans and lights may turn on while the display stays blank, leaving you unable to reach Windows. Record what happens before changing parts or settings.
A shutdown during gaming can have several causes, including power delivery, heat, or a component issue. Symptoms alone do not identify a failed part, and a passing memory scan does not rule out unstable settings or intermittent faults.
When the PC will not complete startup
Use this checklist to gather clues safely:
- Note motherboard debug lights or on-screen codes.
- Verify external power and display connections.
- Check the PC or motherboard manual for code meanings.
- Try manufacturer preboot diagnostics if available.
- Record whether failure happens at startup or under load.
A code can point toward an area to inspect, but its meaning depends on the motherboard or PC model. Use the matching manual rather than guessing from a code found elsewhere.
When it shuts off under load
Note whether shutdowns happen during gaming, video work, or another demanding task. A pattern may help separate a load-related problem from a failure that also occurs while idle.
Reseating RAM or removing a GPU involves internal work. Attempt it only if you are comfortable, follow the manufacturer’s safety steps, and disconnect power first.
Further hardware troubleshooting steps can help you check connections and decide when DIY work should stop. Next, use the evidence you collected to choose a safe action.
Interpret Diagnostic Results and Decide What to Do
One warning in a report does not prove that a component has failed. Compare the evidence with the symptom, timestamp, and error code before choosing an appropriate action.
Independent evidence from a log and a component test is more useful than one unexplained warning. Repeat only the relevant test, and only when the conditions are safe.
Separate a warning from a confirmed failure
A warning may point to a driver, service, or setting that needs review. A result that names a failed test or gives a specific error code is stronger evidence, but it still needs the right model-specific meaning.
Match the result’s time to when the crash, shutdown, or slowdown happened. If the time does not fit the symptom, do not assume the warning explains it.
Choose a next step from the evidence
Record the tool name, result, code, and recent configuration changes. Include a driver update, new hardware, or changed memory settings if any occurred.
Use the manufacturer’s instructions for a named error code rather than guessing. A code can have a specific meaning on one system and a different meaning elsewhere.
If one safe repeat test produces the same result, preserve the record before making changes. When tests show no errors but the issue remains, focus on reproducing the symptom.
What Can You Do When Tests Find No Errors?
Intermittent faults can disappear during a short scan, so a clean result does not guarantee stable operation. Treat a clean test as evidence, not proof that the issue is gone.
Avoid repeated stress tests if they trigger shutdowns or abnormal behavior. Use these steps to collect better information without forcing the PC through unsafe conditions.
- Reproduce and record the exact symptom.
- Note whether it follows a workload or recent change.
- Check for driver or software changes.
- Run the relevant test again under comparable conditions.
- Seek qualified repair help if instability continues.
For example, note whether a crash occurs only after a game starts or also during ordinary use. The pattern can narrow troubleshooting without assuming a particular root cause.
Repeat a test under similar conditions only when doing so is safe. If the system continues to fail, qualified repair help can assess issues that short automated diagnostics may miss.
Keep a concise record of what you tried so later troubleshooting can build on the results you already have.
Keep a Useful Record of Diagnostic Results
If crashes began after a driver or hardware change, record that link and the date. A clear timeline can reveal patterns that a single test cannot show.
Write down the date, symptom, test or tool, result, error code, and changes made. That diagnostic data gives you a useful history when performance drops or crashes return.
A repeat check is most useful after a relevant repair, driver change, or hardware change. Running every test continuously adds little value when the system has no new symptom.
A simple record can help you spot recurring crashes or performance drops. Note whether a problem returns under the same workload or after a similar change.
Periodic health checks are optional maintenance, not a substitute for responding to a new symptom. Keep records that help you monitor system health, then use the closing reminder to choose a check by symptom.
Record what happened, what you tested, and what changed before the problem returned.
Conclusion
Targeted diagnostics are more useful than running every utility at random. The best first test depends on the symptom, and a clean result cannot rule out every intermittent fault.
Run one relevant check, save its result or error code, and seek professional repair help if the PC remains unstable. Get help promptly when a test reports a serious problem or the computer shuts down repeatedly.
For your next step, record the symptom and run the check that best matches it.

 By
By
 By
By